The Basics of Drywall Installation

Drywall Installation Naperville is relatively easy, but there are a few important things to remember. Having these in mind will save you some headaches and extra work.

First, sit the end of each panel halfway over a stud. This helps to add strength to your wall and reduce cracks along seams.

Drywall is an important home improvement material that can enhance energy efficiency and provide fire resistance, but a professional installation requires careful preparation. By learning the basics of drywall installation and following best practices, homeowners can reduce the risk of costly mistakes and ensure a smooth finish.

Preparation includes clearing the space, gathering tools and materials, installing blocking, and protecting floors and other surfaces. It also involves removing any existing wall coverings and ensuring that the walls are structurally sound. This ensures that the drywall will adhere well to the wall or ceiling, resulting in a professional-looking end result.

In addition, homeowners should familiarize themselves with the different types of drywall to determine which one is right for their project. Once the type has been determined, it’s helpful to calculate how much drywall is needed. By using a tape measure, a T-square, and a utility knife to mark where each cut will be made, homeowners can maximize the use of full sheets and minimize waste.

Before cutting, it’s important to carefully examine the framing for bowed or twisted studs. While a visual inspection is usually enough to spot these problems, a straightedge can be used for more thorough examination. If a stud is badly bowed or twisted, it should be straightened or replaced.

When it comes to hanging drywall, it’s best to get help from a friend or hire a professional if possible. Working alone can be difficult, especially when the drywall is heavy. Additionally, a professional can help homeowners avoid common mistakes that beginners often make during drywall installation such as failing to tape and finish the seams.

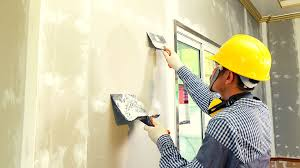
Once the drywall is hung, the next step is to cover and finish the seams and screw holes with joint compound (also known as mud). To tape the joints, first apply a coat of mud to the surface and let it dry completely. Then, apply a layer of drywall tape over the seams and smooth it out with a drywall knife. Finally, apply a second coat of mud and sand lightly between coats to achieve a smooth finish.

Cutting

Before cutting drywall, lay out the sheet on a flat, stable surface. If possible, do this in a well-lit area with good lighting. You can make the cuts before you begin hanging the drywall to save time, but it’s usually best to cut as you go along so that you don’t waste any material. Use a tape measure and a T square to mark your lines for cutting. When marking for window and door openings, be sure to leave 1/8 inch of extra space at the edge of the frame. A utility knife is a good tool for making small cuts. A keyhole saw or circle cutter is useful for cutting spaces for outlets and light switches.

If you’re going to use a power tool for the cutting, wear a dust mask. This will keep the dust from contaminating your lungs and also protect you from anything behind the wall that could be damaged by a saw.

When cutting drywall, start at one end of the line and work your way across. Use steady pressure to avoid tearing the paper. When you reach the other end of the line, turn the drywall over and use your blade to cut through the paper. Continue this process until you’ve cut through all of the drywall.

You can also score and cut drywall while it’s on its side by using a utility knife. This method is quicker than cutting with a power saw and doesn’t require any extra tools.

If there’s a spot on the wall where you can’t get a drywall cut with a knife, try using a power tool to cut through the paper and the underlying drywall. Just be sure to use a wide blade so you don’t tear through the structural drywall.

Once the drywall is cut, run a putty knife gently over all of the screw or nail heads to set them below the surface. This makes the tape job much easier and prevents the fasteners from showing through the finished wall. This is also a great time to drive in any missing screws or nails.
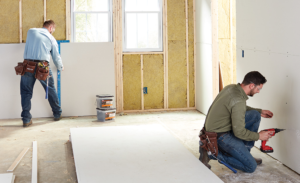
Hanging

When all the cutting is done, it’s time to start hanging the drywall. Start at the top of the wall, accounting for any window or door openings and other framing details. It’s a good idea to have someone help you lift the drywall sheets, since they can be quite heavy.

Once the first sheet is in place, screw it to the studs. Use a power drill and ring drywall screws, which will hold the drywall securely without breaking or creating too big of a hole to patch later. It’s a good idea to run a stud finder before starting so you know exactly where the studs are, and you can also mark them with a high-visibility marker.

After the drywall is secured, you’ll want to finish it by adding paper or fiberglass-mesh tape at all the seams and corners, followed by the typical three layers of joint compound. This makes the surface of the drywall smooth and ready to paint.

If the drywall is being hung over a ceiling, it’s a good idea to install wood backers (or OSB boards cut in about 4-foot strips) to make sure there are no dents or bumps in the drywall. This will protect the ceiling from moisture and mold, as well as prevent the drywall from pulling away from the ceiling joists when the paint is applied.

One other tip that can save you a lot of grief later on is to get a couple pieces of drywall scrap and screw the end of the sheet being hung to them. This will give you a 3” overhang to work with, and if you happen to screw it into a stud it’ll be nice and tight.

Finally, always drag a putty knife over every screwhead to set it below the surface of the drywall. It’s a common installation mistake to forget this step, and it will create a mess for the taper when you come to finish the wall. Plus, if you don’t set the fasteners right, they may eventually pop out and ruin the wall.

Finishing

The finishing stage is where drywall truly shines. It’s a critical step that takes the bare-bones room from unfinished and unsightly to clean, finished and beautiful. Taping and mudding are a labor-intensive process that requires patience and attention to detail.

A well-trained crew that works seamlessly can finish a drywall job in half the time of an inexperienced crew and produce a higher quality result. To minimize drywall installation costs, do your prep work yourself, use standard sizes of drywall sheets and schedule your project during off-peak times.

Drywall is available in a variety of finishes, each designed to accommodate different types of wall coverings and levels of visibility. The appropriate level depends on the room’s purpose and usage and may be influenced by aesthetic goals.

Level 1 – No taping or finishing, which provides basic smoke and sound control for areas not visible to the public, such as garages and storage spaces. Drywall with tape embedded in joint compound at seams and corners, but not sanded or smoothed.

Level 2 – A single coat of mud applied over the tape, with a hand or power sander to smooth the coat. This level is appropriate for a clean, utilitarian space, such as a workshop or basement that will be painted.

Level 3 – Similar to Level 2, but with all flats, butts and angles coated twice. Corners are boxed, with the corner bead both coated and smoothed with a wheeled box tool. This level is typically used for areas that will be textured, such as garages or service corridors.

Level 4 – All of the above, plus a skim coat that is smoothed across all surfaces. This level is ideal for a finished room that will be painted or wallpapered, and helps minimize joint photographing and fastener visibility.

What You Should Know About Sewer Inspections

A faulty sewer line can be extremely costly to repair. That’s why it’s important to get Sewer Inspection Los Angeles before buying a new home.

Sewer Inspections

A well-maintained sewer line can boost your home’s resale value. It also shows potential buyers that you’re a proactive homeowner. This can help you negotiate a better deal and close the sale quickly.

The preparation process for a sewer line inspection involves clearing the area around the access points for the inspection. This allows inspectors to get to work quickly and prevents delays. It also helps to ensure that the pipes are clear of obstructions, such as roots and debris. Lastly, it is important to inform all stakeholders and occupants of the inspection before it takes place. This will help them understand the process and allow them to prepare accordingly.

Sewer inspections are an essential part of any home maintenance program. They can help identify damage to the pipes and prevent clogs or leaks. A clogged or damaged sewer pipe can lead to serious health problems and costly repairs. This is why it is essential to schedule these inspections regularly.

A professional plumber can use a special camera to examine the interior of your pipes and determine whether they are functioning properly. The process usually takes a few minutes and is very safe. You can watch the video feed on a monitor as the contractor moves the camera through the pipe. The contractor will then describe the findings and recommend next steps.

If you are selling your home, a sewer line scope inspection can provide vital information to potential buyers. This will help them make an informed decision about the property and its value. If the inspection reveals that the sewer lines are damaged or in need of repair, you can choose to address these issues before listing the property. Alternatively, you can offer a price reduction or credit to compensate for the cost of repairs.

The most common causes of blocked or damaged sewer lines are root intrusions and ground movement. The former is due to fast-growing tree roots that enter the sewer pipes and cause blockages or leaks. The latter is caused by soil shifting that can cause misalignment of the pipes. If left unattended, these problems can worsen and lead to costly repairs. Proper maintenance and regular inspections can help avoid these problems. In addition, a sewer inspection can reveal the condition of the lines and determine whether they are fit for service.

Inspection

When a homeowner suspects something is wrong with their sewer lines, they can hire an inspector to perform a video inspection. This process involves inserting a flexible rod with a camera attached to it into the cleanout or main sewer trap. Once the rod is in place, the technician can navigate the pipe to locate problems. The video feed is then viewed on a monitor, and the technician records what they find.

During the inspection, the technician looks for common issues such as root intrusion, cracks in the line, broken joints, and misaligned pipes. They also check for signs of leaks and identify the severity of the problem. A report is then prepared, which outlines the results of the inspection and offers recommendations for repair or maintenance. The report should also include the cost of any repairs or replacements that are recommended.

In addition to identifying potential problems, the report should also include details about the condition of the pipes and the type of material they are made from. This information can help homeowners make informed decisions about their home’s plumbing and maintenance needs.

A clogged or damaged sewer line can lead to serious health and safety risks. In addition, it can result in costly damage to the property. Performing a sewer scope inspection before buying a new home can save buyers from unanticipated expenses down the road.

The first step in the sewer scope process is to identify the access point. This is usually the existing clean-out or main sewer trap. The technician will then locate the entry point to the main sewer line. This allows them to enter the pipe without removing any parts of the house.

Once the access point is located, the technician will remove the clean-out cover and insert the camera into its opening. The camera is equipped with LED lights to illuminate the interior of the pipe. The technician will then follow the camera through the pipe, evaluating its condition as they go. They will note any problems they encounter and assess the severity of each one.

Report

The report generated from a sewer scope inspection contains a variety of information. It includes the condition of the line, recommendations for repairs or maintenance, and video footage. It also identifies any issues that may affect the home’s resale value. It is important to have a thorough and comprehensive report. Ideally, it should include a diagram of the line’s condition and a description of any issues found.

The most common method of performing a sewer scope involves using a camera to evaluate the condition of the drain lines. A camera is inserted into the drain system through a cleanout in the basement, crawlspace, or exterior yard. The technician then records the results on a monitor. Unlike traditional methods, which involve physically entering the pipes and inspecting them with a flashlight, this process is less invasive and can be completed more quickly.

Moreover, this method provides detailed, crystal-clear images of the interior of the pipe. This enables technicians to identify problems like root intrusion, cracks, and leaks. In addition, the technology can also determine the location and depth of the problem. This data is useful for planning repairs and scheduling future cleanings.

As a result, a comprehensive sewer scope report is vital for homeowners. This type of report will help them understand the condition of their sewer lines and prevent costly repairs in the future. In addition, it will help them avoid unpleasant situations, such as a clogged toilet or wastewater backing up into the house.

Some home inspectors offer a combined service, where they inspect the home and conduct a sewer scope. This can be convenient, but it is important to find an inspector who has experience with both of these services. A home inspector who is not familiar with a sewer scope will not be able to accurately assess the condition of the plumbing system.

It is also important to know that a sewer scope is not a substitute for a full home inspection. While a home inspector will check the plumbing fixtures and look for any obvious signs of problems, they cannot do a complete job. A sewer scope inspection will identify any major problems, but it will not detect everything, such as small issues that could become problematic in the future.

Cost

The cost of sewer inspection varies depending on the complexity of the work and where the lines are located. However, on average, a sewer line camera inspection costs $125 to $500. This fee does not include any repairs or upgrades that may be needed.

Having a professional perform a sewer inspection can save you from expensive plumbing repairs in the future. It also ensures that your home is free of bacteria and parasites that could pose a health threat. Moreover, a sewer inspection can help you determine the type of materials used in your sewer pipes and identify any potential problems before they become more serious.

In addition to identifying problems, a professional can also help you understand how your sewer system works. They can tell you the location of any blockages or leaks and help you find the best way to repair them. They can also recommend ways to improve your drainage and prevent future issues.

A typical sewer line inspection involves running a specialized video camera through the pipes to check their condition. The camera feeds live images to a monitor, allowing the inspector to locate any issues. A clog, for example, can be caused by tree roots or decades of waste that have collected inside the pipes. The camera can also help determine if the pipe is offset or broken, which can cause serious damage if not fixed.

Performing a sewer inspection can also reveal other issues, such as displaced joints or sagging lines. These issues can be costly to repair, and they can even lead to sewage backups. Regular inspections are recommended if you have a lot of trees on your property, as they can infiltrate and clog the sewer pipes.

A clogged sewer line can also affect your water pressure and make it difficult to clean the yard or take a shower. It can also cause the grass to grow thicker in certain areas, since sewage acts as a natural fertilizer. While the cost of a sewer inspection is not cheap, it can be cheaper than repairing a flooded basement or contaminated soil.

What You Need to Know About Water Damage Restoration

Ideally, you want to hire an IICRC-certified water damage restoration expert. This means that they will abide by industry standards and best practices. They will also have the tools to effectively restore the damaged property. Reach out to All Pro Services for expert assistance.

Water Damage

The first step in addressing water damage is to determine how the water entered your home or business. You should then take the necessary steps to stop the flow of water and protect the area.

Water damage restoration is expensive. There are a number of factors that affect the cost, including the type and severity of the damage, the location of the property, and the amount of work needed to restore it. Homeowners can reduce their costs by following a few simple steps. For example, they can shut off the water at the source and remove throw rugs to facilitate drying. They can also open cabinet doors to allow the drying process to take place more efficiently. Additionally, they can hire water damage specialists for quick and effective repair work.

The type of water that entered the house will greatly impact the cost of the restoration process. Qualified professionals use water quality meters to determine the classification of each case. This helps them determine how clean the water is and how much contact it had with dirt, grime, or sewage. This information is critical to insurers when determining payouts for insurance claims.

Clean water damage is classified as category 1 and can be caused by a variety of sources, including a broken pipe, overflowing appliances, and heavy rains. It is less costly than category 2 water damage, which can contain contaminants that pose a health risk and must be cleaned up immediately. Category 3 water damage, which is highly contaminated and usually comes from sewers, lakes, or rivers, is the most expensive type of water damage to restore.

Labor is another significant factor that affects the cost of water restoration. It is important to find a company that offers competitive rates for their services. It is also recommended to check whether the company has a license, certified experts in restoration, and adequate insurance coverage. In addition, it is essential to consider the cost of equipment and transportation.

The longer water is left unattended, the more expensive it will be to restore a home. Leaving water standing for long periods of time can lead to the growth of mold and mildew, pervasive musty odors, and electrical damage. These problems are often not covered by homeowner’s insurance and may require special treatment, which can be very expensive. In order to avoid these issues, homeowners should regularly check the water hoses attached to their appliances, keep their gutters clean, and have their roof repaired when needed.

Certifications

Water damage can cause serious health risks, structural issues and mold growth. It’s important to act quickly to mitigate damages and minimize costs. This is why it’s a good idea to hire professional restoration services. This way, you can be sure that the process will be completed effectively and efficiently.

The first step of a water restoration project is initial assessment and mitigation. This involves inspecting the affected areas, identifying the source of the water and measuring moisture levels using specialized equipment. The process also includes determining the level of contamination, which is important for evaluating insurance claims and deciding on a plan for remediation.

Certified technicians have the knowledge and expertise to handle all types of water damage restoration projects. They know how to use specialized tools that speed up the restoration process and reduce damage. They also have extensive experience in navigating the complex process of filing insurance claims.

To become a certified water restoration technician, you must pass the IICRC Water Restoration Technician course. This course will teach you the basics of water damage restoration, including assessing damaged property and repairing structures. It will also teach you how to set up drying equipment and monitor the progress of your work. In addition, the course will teach you how to use specialized tools and equipment, such as moisture meters and air movers.

Once the affected area has been dried and dehumidified, it must be cleaned and sanitized to remove any contaminants or bacteria. This is done with specialized cleaning solutions and equipment that can eliminate bacteria, mold spores, and other contaminants. It is also important to clean and disinfect the property’s structure, as well as its contents.

Water damage can be very difficult to deal with, and it’s essential to call a water damage restoration company as soon as possible. The longer a property is exposed to water, the more extensive the damage will be. In some cases, the damage will be too extensive to salvage anything, and the structural integrity of the property may be compromised. The most common signs of severe water damage include stains on the walls, ceilings, and floors; mold growth; and cracks in the foundation or floors.

Experience

Water damage restoration is the process of repairing and restoring property after it has been damaged by water. This can be caused by a variety of reasons, including broken pipes, flooding from storms or overflowing appliances. The best way to address water damage is to hire a professional team who has experience handling these types of restorations. They will have the tools and expertise to get the job done quickly and efficiently. They will also be able to advise you on what steps to take next.

The first step in the water damage restoration process is assessing the extent of the damage. This includes looking for water stains, swelling and other signs of damage. Once the assessment is complete, it is important to turn off the power in the area and remove any standing water. It is also a good idea to take photos of the area before beginning the cleanup process.

Once the water has been removed, it is time to clean and disinfect the area. This step is vital, as it can prevent the spread of bacteria and other pathogens in the home. It is also important to use dehumidifiers and ozone generators to help speed up the drying process.

After the cleaning and disinfection process is completed, it is time to restore the affected areas. This can include drywall, carpets and other surfaces. It is important to note that some materials may be permanently damaged, so it is important to consult a professional.

When choosing a water damage restoration company, look for one with years of experience. This will give you confidence that they know what they are doing and will be able to handle any situation that may arise. Additionally, a company with years of experience will likely have built up a strong reputation in the industry and can offer referrals to potential clients.

Water damage is a common problem for homeowners. Whether it’s a burst pipe or a flood from rain, the consequences can be devastating. In some cases, it can even lead to structural damage. Water damage repair requires special equipment and skills, and can be very expensive. However, it is possible to reduce the cost by choosing a reliable contractor and taking advantage of any insurance coverage that you have.

Insurance

When water damage occurs, homeowners often have questions about their insurance coverage. It’s important to understand your policy’s covered perils and exclusions so that you can make informed decisions regarding mitigation and restoration. In addition, it’s helpful to know if your property is eligible for flood insurance.

A homeowner can mitigate water damage and speed up the insurance claims process by acting quickly and documenting the damages. It’s also important to work with a qualified emergency water cleanup service New Jersey to prevent further damage and minimize costs. In addition, you can also save money by negotiating with your insurance company.

In most cases, homeowners’ insurance covers the cost of water damage restoration. However, the process can be complicated and time-consuming, so it’s important to hire an experienced professional to help you navigate it. There are several steps that you should take before filing a claim, including reviewing the insurance policy, taking photos of the damage, and contacting your local water restoration company.

Once you’ve filed a claim, you should receive an insurance adjuster to assess the damage. This person will look at the cause of the damage and determine whether it is covered under your policy. He or she will also evaluate your rebuilding costs and provide you with an estimate. It’s important to keep track of all documentation related to your insurance claim, including receipts, repair invoices, and estimates. Keeping track of this information will help you build a strong case and get the most out of your settlement.

Homeowners’ insurance policies typically cover accidental damage, such as a burst pipe. However, gradual damage, such as a slow leak, is not usually covered. In some instances, the insurance company may deny your claim or offer a low settlement. This is why it’s important to contact an attorney who can review your insurance policy and help you build a strong case for your claim.

A professional water damage restoration company will be able to prevent further damage and restore your home faster than you can. They will start with a thorough inspection and take detailed pictures of the damaged areas before starting any work. They will also conduct humidity and moisture testing to ensure that all issues have been addressed. They will then begin the water damage restoration process, which can take up to four months.

Safety Tips For Stump Grinding

Stump Grinding is a great way to reclaim your yard space and improve the overall look of your property. It also prevents pesky pests from infesting your lawn and garden areas.

Stump Grinding

Before beginning the stump grinding process, it is important to prepare the work area. This involves putting up barricades and proper safety measures.

Stumps are an unsightly eyesore that detract from the overall beauty of your property. They also serve as a tripping hazard and can easily interfere with lawn maintenance equipment. Precision stump grinding removes all traces of the old tree, leaving your yard with a polished look and eliminating any potential hazards.

Stump grinding involves using specialized equipment to grind down the remains of a previously-standing tree. The machine uses a rotating cutting disc to crush and chip the formerly-standing stump into wood chips. The chips can be removed from the site or used as mulch. This method is less invasive and more cost-effective than other methods of removing tree stumps, such as digging out or burning the remnants. It also prevents the sprouting of new growth and eliminates pest infestations.

Stump grinding leaves no visual evidence of the previous tree, allowing you to plant grass in the same spot or create another landscaping feature on your property. In addition, it reduces the risk of tripping hazards and improves curb appeal. This is especially important for properties with children or senior citizens, as a stump can be a serious fall hazard. Stump grinding also eliminates pesky insect infestations that often occur in the remaining stump, including termites and carpenter ants.

Hiring professionals to perform the stump grinding process ensures that the job is done correctly and safely. Attempting to remove a tree stump with an improperly-operated stump grinder can result in injury or property damage. Professionals use the appropriate equipment and are insured, ensuring that your home is safe for all family members and visitors.

Post-grinding, the options for your garden are limitless. You can expand your lawn, plant a flower bed, or even start a vegetable garden. Stumps take up space that could be utilized for other purposes, such as a pool or patio. By removing the unsightly stump, you can create more usable space on your property and increase its overall value.

When it comes to maintaining your outdoor spaces, there are few services as important as stump grinding. The advantages of this landscape service are many, from improving your lawn’s aesthetics and safety to preventing pest infestations and freeing up valuable space on your property.

Safety

Stump Grinding is a popular and effective method for removing unwanted tree stumps from landscapes. However, it involves powerful machinery that can pose risks if not handled properly. The following are a few important safety tips to ensure a safe and successful stump grinding process.

Inspect the Area

Before starting the job, a professional will thoroughly inspect the area to make sure that there are no rocks or other obstacles that could interfere with the grinder. In addition, they will check for buried underground utilities such as water lines or gas pipes. It is important to mark these utilities before beginning the stump grinding process.

Proper Protective Equipment

One of the biggest hazards of stump grinding is sparks from the machine. It is essential to minimize this risk by using the equipment only during periods of low fire danger, removing rocks or other hard objects from the work site before starting the machine, and using proper protective gear. This includes a helmet, safety goggles or a face shield, ear protection, and heavy-duty gloves. It is also important to read the manual before operating the machine.

Avoid Stump Grinding During Wet Weather

Stump grinding can cause erosion and compaction of the soil. In addition, it can damage nearby landscaping and structures. During wet weather, these problems can be more severe and take longer to resolve. However, there are ways to reduce the impact of stump grinding on the surrounding environment, such as using wood chips as mulch or placing them back into the hole.

Prevent Infestation

Old stumps can attract pests, including termites and ants. By removing them, you can prevent these pests from invading your yard and causing further damage. Stump grinding also increases the amount of usable space in your yard.

Besides aesthetically improving your property, stump grinding can also improve your business’s image and reputation. It can help you win new clients and retain existing ones. In addition, it can save you money on labor costs and other expenses related to hiring a landscaping company. Moreover, it can help you earn more money by providing a better-looking finished product.

Environmental impact

The stump grinding process can affect the surrounding environment, but it is important to choose a qualified company that prioritises environmental sustainability. By using specialised equipment, minimizing soil disturbance and repurposing the wood chippings as mulch, these environmental impacts can be minimised.

The removal of a tree stump and root system can help reduce erosion by removing obstacles that prevent the flow of water, which can otherwise lead to soil loss. This method also helps restore soil stability and increases the overall health of the landscape.

Stumps can contaminate the soil with roots and bark, creating a habitat for pests and disease, which can be spread to nearby plants and trees. Stump grinding eliminates these breeding sites, which can damage other vegetation and create a risk to the health of your garden.

Removing a stump and its roots can also encourage new growth in the surrounding garden, which can help reduce the need for chemical fertilizers, which can be harmful to the environment. Additionally, the nutrient-rich mulch that is produced during the grinding process can improve the soil quality of your garden, encouraging healthy, balanced plant growth.

One of the most significant environmental issues associated with stump grinding is the amount of dust it produces. This can affect air quality, particularly in urban areas, where air pollution is already a problem.

Another potential issue is the impact of stump grinding on soil compaction, which can damage or inhibit the growth of other vegetation and cause disruption to natural ecosystems. This can occur if the machinery used during the stump grinding process is not properly maintained or operated, or if the stump is situated on top of or below a sensitive layer of soil.

Once a tree stump is removed, the roots can begin to rot, which can attract insects and other pests that can damage your yard and even invade your home. Stump grinding can prevent this by eliminating the rotting stump and relocating its roots. If the roots are exposed, covering them with mulch or planting grass can protect them from ground traffic and enhance the look of your landscape.

Increased property value

Stumps are unsightly and take away from your home’s curb appeal, which is often one of the first things potential buyers notice. Stump grinding is a simple way to improve the appearance of your yard and increase your property value.

The best part is that stump grinding eliminates the root system of the stump, so you can easily plant grass, flowers or a tree in its place. This also helps prevent tripping hazards and reduces the risk of damage to lawn mowers or other equipment.

Stump grinding is also an effective way to reduce the risk of pest infestations. A rotting stump can quickly become a habitat for termites, ants or other wood-eating insects that may spread to your other trees and shrubs and eventually enter your home. Stump grinding ensures the stump is completely removed, making your yard a safer place for your family and guests.

A professional Stump Grinding Company can help you avoid costly liabilities. By identifying potential hazards before beginning work, the experts can minimize the risks of damaging underground pipes and foundations. They can also provide advice on how to maintain the safety of your children and pets while the job is in progress.

Stump grinding is a cost-effective solution that can help you get the most out of your landscape and home. With increased usable space, improved aesthetics, enhanced landscape design and reduced maintenance, it is no wonder that this service can significantly increase your property’s value. Whether you’re looking to sell your home or simply want to enhance the look of your yard, this is a quick and easy way to do it. For more information, contact a local stump grinding company today. They can discuss your options and provide a free estimate. Their services will leave your yard clean and beautiful, increasing your resale value and overall satisfaction. They can even make the process more convenient by working around your schedule. You can rest assured that they will use the latest equipment and tools to complete your project safely and efficiently. Be sure to notify them if there are any obstacles in your yard, such as rocks or other plants that may need to be moved before the grinding begins.

Hunting Boots – What Makes a Good Hunting Boot?

Hunting boots need to be tough, rugged and supportive. You wouldn’t want to wear a stiff mountaineering boot while pursuing goats or sheep in steep terrain, for instance.

Hunting Boots

You also wouldn’t want to wear rubber hunting boots while stalking silently into bow range on a bedded buck. So, what factors go into making the best hunting boots? Discover top gear at Bugle For Elk for Hunting.

Among a hunter’s most important pieces of gear are his boots. A great pair of boots allows him to climb steep, rugged terrain, walk long distances, wade swamps, and stalk silently into bow range on that bedded buck. If his feet are frostbitten or blistered, however, he will likely not be willing to stay out until dark on a turkey hunt or hike that final ridge for an elk.

The upper part of a hunting boot may be made from leather, nylon or some combination. A quality upper will be constructed from full-grain leather that has been treated with a waterproof coating, such as GORE-TEX. This will keep water out and allow sweat to pass through, keeping the feet dry and comfortable. Boots with a full-grain leather upper are considered more durable than those with a top-grain leather or even genuine leather.

Boot height is another factor that influences a hunter’s choice. A good choice for a typical early-season bowhunt would be a 9-10″ boot that provides support and stability while keeping the feet out of the way of branches, thistles, and thorny brambles. Boots that creep up to the calf are ideal for stalking and driving hunts, while those in the 13-16″ range will be a hunter’s fortress against extreme weather conditions, such as deep snow or high water.

A seasoned hunter will probably have multiple pairs of hunting boots, to match the different conditions and hunting intensity. When making a boot purchase, the safety spec, comfort features and slip resistance are also factors to consider. Boots that are properly broken in will be very comfortable and will perform well over time. Start with short sessions, and gradually increase the amount of time you wear them.

Midsole

The midsole of a Hunting boot is the part that sits between the footbed and the outsole. It’s typically made of nylon, carbon fiber or fiberglass and is what provides rigidity in a boot. It also absorbs the shock of walking and running, reducing the amount of pressure placed on your feet and calves.

The type of midsole material you choose depends on several factors, such as the terrain and season in which you hunt. For example, if you’re hunting early in the season, when it’s likely to be wet and covered in brush and branches, you may want to consider a softer boot with more flexibility. This will help you avoid stepping on and snapping every twig and branch you come across.

On the other hand, if you’re hiking long distances and putting in 100km days on the backcountry, you may prefer a stiffer boot with more stability. Some manufacturers, like Crispi, offer a midsole made of a blend of materials for ultimate durability and comfort.

The traction and ankle support of boots are also critical to avoiding injuries, especially during long, strenuous hunts. Strong traction helps prevent slips and falls, while ankle support reduces the likelihood of twists and sprains. In addition, well-supported feet allow you to cover greater distances with less fatigue, ensuring that you can find the game you’re looking for.

Outsole

The outsole is the bottom part of a Hunting boot that provides traction, protection and stability. It’s often made of rubber, which is durable and can stand up to a lot of wear and tear. It also should be designed for the terrain where you’ll be hunting, so look for an outsole that has lugs that will grip well on muddy or sandy surfaces.

The heel and toe of the outsole should be curved, which helps keep your feet stable while you’re on the move. The outsole of a good hunting boot should also be sturdy and waterproof. If you’re buying boots online, make sure they’re guaranteed to be waterproof by looking for a “waterproof” label on the product description.

A good pair of Hunting boots can make the difference between a comfortable day in the field and hoofing it back to the truck because your feet hurt. So if you want to get the most out of your hunting experience, prioritize fit and comfort above all else. If you’re looking for a boot that fits well, try them on later in the day when your feet are swollen, as this will more closely mimic the state they will be in during hunting.

Also, be sure to select a boot that’s made from “full-grain” leather, as this is the highest quality and will last much longer than cheaper “genuine” leather. And always choose a hunting boot with a shank, as this will help prevent foot and ankle injuries when walking over rough terrain. The right footwear can help you stay on your feet all day, even while carrying a heavy pack. Then you can focus on the hunt and not your feet.

Insulation

The insulation part of a Hunting boot provides protection from cold environments. This includes not only ice, snow and sleet but also damp vegetation, muddy or sandy ground, and even pond water. Wet feet cause blisters and cut short hunts, so waterproof boots are a must.

The key to effective insulation is trapping a layer of air warmed by your body heat. Nature has perfected this technique with polar bears, waterfowl and other cold-weather animals. Modern boot insulation materials take advantage of this science, with synthetic options such as PrimaLoft and insulated GORE-TEX membranes used to make boots both lightweight and warm.

Waterproofness is important, but so too is breathability. The best hunting boots feature a combination of both features. They lock out water while allowing perspiration vapor to escape, keeping your feet comfortable and dry in any environment.

Choosing the right insulation depends on the climate in which you intend to hunt. Early-season hunting typically takes place in warmer, drier conditions and requires less insulation than the winter season. For example, a summer hunting boot may only have 200 grams of insulation.

As temperatures drop, hunters move to colder terrain and rely more on heavy-duty insulation to stay comfortable. A full-on winter Hunting boot may feature 1000 gram or more of insulation. The type of terrain you plan to hunt will also determine the traction on the bottom of your boots. Boots with deep lugs are designed for rugged, mountainous terrain while boots with a more minimal traction are suitable for low-country hunting. For instance, Schnee’s Granite series of insulated boots is specifically designed for late season wilderness elk hunts, which involve plenty of walking and climbing in steep, rough terrain where a twisted ankle can easily derail a hunt.

Footbed

The footbed is the bottom part of the shoe where your feet touch it. It’s a soft layer that supports your foot, and it can have different materials or design depending on the purpose of the shoe. The right footbed can make or break a pair of boots. It can have a huge impact on comfort and support, so it’s important to consider this when looking for the perfect boot.

The material used in the footbed can determine how soft or hard the shoes are. If the footbed is too soft, your feet can easily slip inside the boots and cause blisters. If the footbed is too hard, it will not form to the shape of your feet, resulting in an uncomfortable experience. It is also important to consider if the footbed has enough cushioning to keep your feet comfortable and safe.

Another aspect that determines the comfort of a shoe is how tight it fits. A loose fit causes friction between the feet and boots, amplifying any bumps or bruises that may occur while hiking. It can also make it hard to navigate rugged terrains. Getting the right fit is important when choosing a Hunting boot.

Although it might be tempting to think that Hunting boots are just hiking shoes on steroids, they serve a different purpose and perform differently. They are designed to protect the feet from rough terrains, cold weather, and even to help with tracking game. 

Sedimentation Processes

Liquid Waste Removal Perth is a complex process with numerous rules and regulations. Businesses that prioritize proper waste management help protect the environment and human health.

Liquid waste management includes treatment and disposal methods like land application, septic tanks, and injection wells. These techniques prevent contaminated runoff into water and soil sources, ensuring that drinking water is safe for residents.

Sedimentation is a process in removing liquid waste that involves physically separating solid particles from the liquid. This is accomplished by allowing heavier particles to settle at the bottom of a tank while the clearer liquid flows out for further treatment. The solids are then disposed of as sludge.

This is a common water treatment method used to remove heavy particles from wastewater, but it’s not effective for all applications. This is because sedimentation only removes solids that are denser than the liquid they’re in; particles that are lighter may require different water treatment processes like dissolved air flotation.

During sedimentation, the liquid waste is transferred into a rectangular tank with a sloped bottom. This allows the waste to flow downhill, letting the particles settle at the bottom of the tank for a predetermined amount of time. Afterward, the liquid is discharged from the tank while the solids are collected as sludge for further processing.

The sludge is subsequently treated through several steps to make it safer for disposal. This is particularly important if the waste contains pathogens or other harmful substances that could cause health problems for people and animals. This phase also typically includes disinfection to kill any organisms that remain in the sludge.

Once the sludge is ready for disposal, it can be stored for a short period of time to give it more time to settle. This storage is typically done at sites that are carefully regulated to prevent leaks or spills. These sites are located away from areas that are at risk for natural disasters and regularly inspected to detect any issues early on.

The sludge is then either processed on site or sent to a landfill for final disposal. Some sites also use land application, which entails spreading the liquid waste on a surface covered with grass or crops to help fertilize them. Other disposal methods include ocean dumping, which has been the subject of criticism for its potential harm to marine ecosystems.

Solidification

Liquid waste removal methods may include solidification, which is the process of turning liquid waste into a dense, impermeable material. This method reduces the volume of the waste, allowing it to be stored more easily and more safely. It also reduces the risk of leaks or spills and other environmental risks.

Solidification is a cost-effective option for treating non-hazardous waste streams, and it is easy to apply. Unlike dewatering techniques, which require expensive capital equipment and high operating costs, solidification can be performed in-place and at a lower cost. This is especially true for waste that consists of sludge or low-solids content.

There are several different types of solidification processes, which use various types of binding agents and binders to convert liquid waste into a dense, monolithic material. The binders can be small particles (microencapsulation) or large blocks of wastes (macroencapsulation). These techniques work by mechanically or chemically binding the waste materials into a solid. This process prevents contamination migration by reducing the surface area exposed to leaching and isolating hazardous components within a monolithic mass.

Besides solidification, many other treatment options are available for liquid waste disposal. These methods are based on physical treatment, recycling and reuse, biological degradation, or incineration. Physical treatment involves separating solids from liquids using centrifugation and sedimentation, while recycling and reuse methods allow liquid waste to be converted into usable products.

Incineration is a common method of disposal for hazardous liquid waste. However, it is not an ideal option for a number of reasons. It produces significant amounts of greenhouse gases, which contribute to global warming and climate change. It is also expensive to operate and maintain, as it requires substantial energy.

Other options for liquid waste management include land application, recycling and reuse, and deep well injection. Land application involves the reuse of treated wastewater in agricultural lands, as long as it meets regulatory standards. Recycling and reuse techniques allow liquid waste to be repurposed as raw materials for industrial production, reducing the demand for fresh water. And deep well injection involves pumping the waste into underground wells, where it is isolated from groundwater and the environment.

Disinfection

The handling and disposal of liquid waste is a crucial part of modern business operations, as it can have significant consequences if not dealt with properly. It can cause water, soil, and air contamination that poses a threat to human health and the environment. In addition, if not treated and disposed of correctly, it can also disrupt the natural balance of ecosystems.

Whether it’s sewage, wastewater, or other industrial effluent, proper management of liquid waste is vital for businesses and households alike. It’s important to identify and categorize liquid waste based on its composition and potential hazards, as this will determine the best disposal method.

Disinfection is a key step in the liquid waste removal process. This helps to eliminate any pathogens in the waste and prevent the spread of disease. Common disinfection methods include chlorination and UV disinfection.

Non-hazardous liquid waste can be disposed of through composting, which involves turning the waste into a natural fertilizer that can help crops grow and flourish. This is a clean and environmentally-friendly option that also reduces the volume of hazardous waste, which can be expensive to dispose of.

Hazardous liquid waste, on the other hand, requires more advanced and intensive treatment methods. It can be chemically treated using techniques such as neutralization and oxidation to change its toxicity level, or biologically treated using microbes that break down organic pollutants. The resulting ash and gases can then be safely stored in landfill or incinerated.

Some types of liquid waste may be able to be reused or recycled, reducing the demand on freshwater resources. This can be achieved through processes like membrane filtration and reverse osmosis, or through the use of centrifugal force to spin the water out – think of the “spin cycle” in a washing machine!

Businesses must ensure they follow strict guidelines when dealing with liquid waste, as failing to do so can have serious environmental consequences and even result in legal fines. They can avoid these pitfalls by carrying out regular assessments and conducting chemical analysis on their waste. This can help them to determine their current disposal methods and identify opportunities for improvement, as well as comply with regulatory requirements.

Disposal

Liquid waste management involves the collection, storage, treatment and disposal of wastewaters. These liquids can be toxic, hazardous or corrosive and may require specialised handling. They include household liquids such as sewage and cooking oils, industrial waste byproducts such as chemical effluents, oil and contaminated water, and discarded commercial products such as cleaning fluids and solvents. Liquid waste disposal is heavily regulated and tiny infractions can result in hefty fines.

A business must have a solid strategy in place to manage its liquid waste and comply with regulatory requirements. It can do so by conducting regular waste audits and chemical analyses of its waste streams. This will help identify areas where it can reduce the amount of waste produced. It can also minimize the risk of environmental contamination by keeping a close eye on its disposal site. Ideally, the site should be located far away from surface water sources, which could be jeopardized by a leak from the disposal site.

Different methods are used to treat and dispose of liquid waste, and the best option depends on the type of waste in question. For example, organic waste can be composted to produce fertilizer, while nonhazardous liquid waste containing materials like metal and oil can have its water content extracted by dewatering. Physical and chemical treatments can also be used to purify or decontaminate liquid waste.

Some types of liquid waste can be reused for industrial processes, while other forms can be disposed of through deep well injection. The latter method involves pumping the liquid waste into underground wells that are isolated from groundwater and the environment. This method is highly regulated to prevent groundwater contamination.

If your workplace produces a lot of liquid waste, it’s important to store it in properly labeled bins. Educate your employees so that they know what can and cannot be flushed or poured down the drain, and ensure all bins are kept secure to prevent spillages. You can also recycle some of your liquid waste at authorized facilities, which will help you reduce the amount of garbage you generate.

Ceiling Repair – Identifying and Repairing Ceiling Problems

Over time, ceiling materials, such as drywall or plaster, naturally age. The aging process can manifest as cracks or stains. Identifying these signs is the first step toward effective repair.

Ceiling Repair

If you discover a crack in your ceiling, it is important to support the ceiling. This prevents further damage to the structure of your home. Consult with Ceiling Repair Perth for expert guidance.

When a crack appears on your ceiling, it’s important to distinguish whether the problem is cosmetic or structural. Cracks can have a variety of causes, ranging from normal settling to faulty construction, roof truss uplift, and even water leaks.

The size and shape of the crack will help you determine how serious it is. Small, hairline cracks are not usually a cause for concern and can be expected to disappear over time due to a number of factors, including paint build-up and plaster expansion and contraction. Larger cracks may occur as a result of sudden changes in temperature or humidity, which can cause building materials to expand and contract. This can be especially apparent in areas where the walls meet the ceiling.

However, longer cracks that run in continuous lines and match up with wall cracks indicate a more serious issue that requires immediate professional attention. This is often caused by a shifting foundation or a serious leak that needs to be addressed immediately.

When repairing ceiling cracks, it’s important to start by applying a strip of painter’s tape to the very top edge of the ceiling to protect it from joint compound. Next, cover the crack with a sheet of fiberglass mesh tape, then apply a thin layer of joint compound using a flat trowel with very light pressure, allowing the trowel to skip over the surface. Let the compound dry overnight, then apply a primer and two paint topcoats.

It’s also a good idea to lay down a piece of plastic or a drop cloth in the area where you’re working to catch loose debris and dust, and to remove any furniture that can’t be moved out of the way. This will make cleanup much easier and faster once the job is done.

It’s always a good idea to get a professional assessment of any structural cracks on your ceiling as soon as possible, so that you can address the problem before it worsens. By taking the right steps now, you’ll be able to save yourself a lot of money and trouble down the road.

Water Stains

Water stains in ceilings are a clear sign of a larger problem. They’re not just unsightly, but they can also indicate that more serious damage such as rot or mold is occurring elsewhere in your walls and ceiling. This means the stain is likely to continue to grow and spread, and could eventually be damaging your home’s structural integrity.

The best way to prevent water stains in your ceiling is to identify and fix the underlying cause of the problem. Water stains are often the result of a roof leak, or can be caused by water leaking into your drywall from a faulty shower or tub. They can also be caused by a leaking pipe, or from condensation that buildups in poorly ventilated spaces.

First, it’s important to determine where the stain is coming from and how severe it is. You’ll want to hire a professional roofer, plumber, or HVAC specialist as needed to fix the problem that’s causing the water stains in your ceiling. Once the underlying issue is fixed, you can then remove or cover the water stain in your ceiling with a high-quality stain-blocking primer and paint.

If you’re unsure of the source of your water stain, look for it in close proximity to a sink, toilet or other plumbing fixture. You may be able to hear water dripping as well, which can help you pinpoint the location of the leak. You can also check your water bill to see if it’s higher than usual, which can indicate a leak in your home’s plumbing system.

Once you’ve addressed the underlying cause of your water stains, it’s time to clean them. Start by mixing a mild homemade bleach solvent, using one cup of bleach to three cups of warm water. Dip a washcloth in this solution and gently wipe the stains, starting at the edges of the stain and working your way inwards. It’s important to wear gloves and eye protection during this step.

If your stains are particularly stubborn, you can try using a 100% vinegar solution to help dislodge them from the surface of your ceiling. This will require a little more elbow grease, but it’s a safe and effective way to address tough water stains in your ceiling. Be sure to rinse and scrub the area thoroughly afterward, and allow it to dry completely before you begin painting.

Drywall Repair

Anytime drywall gets damaged, whether it’s a nail hole from hanging art or a crack from an accident with a hammer, it needs to be repaired. Small damage like dings, indents, scrapes and holes can be touched up with spackle or a drywall patch kit and then covered with interior paint to make it look as good as new. But larger issues, such as cracked drywall or water damage, require more substantial fixes.

For these, you’ll need a gallon of drywall compound (also known as drywall mud) and a roll of either paper or mesh tape. Paper tape is easier to work with but requires a little more skill than mesh. If you’re unsure which to purchase, ask your local hardware store employees for advice. They’ll probably recommend a brand and give you some tips on how to use it.

When the damage is on the ceiling, you’ll have to get in the attic or crawl space above to reach the drywall. You’ll also want to know what’s above the drywall, because you don’t want to nick any wires or plumbing in the process of punching through it.

You may be able to repair minor cracks and holes with a drywall patch kit, which is self-adhesive. However, if the crack is wide or it’s accompanied by discoloration or mold, you’ll need to fix the underlying problem. Otherwise, the crack will likely show up again, along with serious moisture and mildew issues.

Once you’ve patched the crack, it should be sanded with fine-grit sandpaper and then lightly sprayed with a primer. Once that’s dry, apply a second coat of drywall compound to the patch, then sand again and feather the edges to blend it into the rest of the wall. If the patch looks shiny, you’ll need to touch it up with a bit more primer and then paint to cover the shine. If the area isn’t shiny, you can skip this step. Just make sure you’re using a primer that matches your drywall compound or mud. Otherwise, the newly painted surface will stand out and look different from the rest of the room.

Painting

Painting is the final touch on a home’s ceiling and can make it look like new again. It’s important to use a good quality brush or a roller with the appropriate nap for your textured ceilings, and a sturdy stepladder. It’s also a good idea to start with a clean slate by repairing cracks, fixing water stains and patching holes before beginning the actual painting.

Before you begin, it’s best to remove as much furniture as possible and cover anything that can’t be moved with drop cloths to protect them from paint splatters. Next, switch off the power to the area and shut off the ceiling fixture lights. This will prevent you from accidentally turning on the light while you’re working. You’ll also want to open all the windows in the room to help keep it well ventilated as you work.

Cracks in a ceiling can result from several issues, from structural settling to temperature changes to poor workmanship during installation. Hairline cracks are usually cosmetic and may only require joint compound or drywall mud patching, but bigger cracks can indicate an underlying problem that needs more involved repair. It’s best to have a professional inspection of a ceiling that shows significant cracking or crumbling plaster to determine the cause and develop an appropriate repair plan.

Water stains on the ceiling are more than an eyesore, they can also signal that there’s an underlying issue with moisture in the home. Addressing the problem is imperative to avoid more costly repairs down the road. Once the leak is fixed, a quick coat of stain-blocking primer and some fresh paint should restore the ceiling to its original condition.

Stains, cracks and holes on a ceiling can have a negative impact on the rest of your home’s interior. Not only do they leave unsightly marks, but they can also expose your home to the elements and affect its energy efficiency. By identifying and addressing ceiling damage early on, you can prevent more expensive repairs in the future and minimize your maintenance costs.

How to Find the Best Auto Repair Shops

Dana Auto Repair is an essential part of owning a vehicle. If you’re concerned about being ripped off, check a shop’s complaint record by contacting your local consumer protection agency. You can also look for certifications.

Word of mouth is a great way to find a good mechanic. Ask your friends, family, and co-workers for recommendations.

A flat-rate pricing system is more honest and easier for the customer to understand. It encourages mechanics to work faster because they’ll make more hourly money. However, the mechanic may be unable to finish the repair in the prescribed time because of other factors (such as a bolt that takes 10 seconds to remove but breaks off). This can lead to poor quality and frustration for the customer.

Some shops have a flat rate manual that lists the amount of time that each repair should take. This can help you estimate the cost of your repair. However, not all repair shops use this system. Some have a standard flat-rate, and some may not have one at all. Some even have an online calculator that helps you determine the price of your car repairs.

Whether you have a new or old car, it’s important to choose the right shop for your vehicle. There are many factors to consider, including the reputation of the shop, the number and type of services offered, the cost of repairs, and whether the shop offers a guarantee. Some shops specialize in particular vehicles or systems, while others focus on general auto repairs. You can also find shops that offer perks such as free car washes, shuttle service, and discount rates.

Inwood Arch Automotive is a local auto repair shop that has been in business for more than 20 years. Its mechanics are certified, and customers have rated them highly on Yelp. The company provides a variety of services, including oil changes, body work, and air conditioning. They also offer discounts to hospital and city employees.

Another way to maximize shop profits is to increase referrals from existing customers. You can do this by creating a referral challenge or program that rewards existing customers for bringing in new ones. For example, if a customer brings in three new customers during a given time range, they may receive a gift card or a percentage off their next repair.

Keeping your existing customers happy is important for a small business. This is because they will recommend your business to others and spread the word. They will also bring in more business during slow periods. You can do this by offering incentives, such as free perks or discounts, or by running special promotions during busy times of the year.

Shops that use a warranty

Shops that use a warranty can provide you with peace of mind about your auto repair needs. A warranty can cover parts and labor and can protect you from high repair costs if something goes wrong with your vehicle. However, some warranties can have limits and exclusions that you should be aware of before purchasing one. Additionally, some warranties are sold by commissioned third parties and may have hidden fees or expensive renewal fees.

While it’s impossible to avoid the need for automotive repairs, you can save money on the cost of these repairs by getting an extended warranty for your car or truck. Many auto repair shops sell these warranties, and it’s important to find a reliable, honest, and reputable dealer. Choosing a shop with a good reputation will ensure that you receive quality service and have a smooth experience during the repair process.

In addition to offering a lifetime guarantee for warranty repairs, some shops also offer a variety of convenience features. These include rental car reimbursement, towing, trip protection, and a cheap monthly payment plan. These features can help you keep your car in good condition, and even improve its resale value.

When choosing a shop for your vehicle, look for a business with a good reputation and extensive equipment. A reputable repair shop will have the latest diagnostic tools and technology, and the technicians should be certified. They should also be experienced in working with your specific vehicle model. If you’re unsure about which shop to choose, ask friends and family for recommendations.

It’s best to choose a repair shop that is registered with the New York State Department of Motor Vehicles (DMV). You can check if a repair shop is registered by looking for a green and white “Registered State of New York Motor Vehicle Repair Shop” sign outside the shop. You can also check with the DMV to see if there are any complaints against that particular shop.

You should avoid auto repair insurance companies that advertise their products through scare tactic promotional materials or by calling your house. These companies are usually commissioned third-party salespeople and may not be around to pay for your repair if you ever need it.

Shops that offer free diagnostics

Many car repair shops charge a diagnostic fee to determine the source of an issue. While this may seem like a waste of money, it’s important to understand that it’s an essential step in the repair process. Without a proper diagnosis, your mechanic might make hasty assumptions and perform unnecessary repairs. This can lead to costly mistakes and overspending. By charging a diagnostic fee, shops ensure that customers are aware of the costs upfront and prevent surprise charges later on.

A reputable shop will have the right tools to perform an accurate diagnosis. For example, they will have a specialized diagnostic computer that can read error codes and analyze other data from the vehicle’s electronic control units (ECU). They also have digital multimeters that measure voltage, current, and resistance to identify electrical issues. A reputable technician will also know how to read and interpret these readings.

Some shops offer free inspections, but these are not the same as a full diagnostic service. An inspection can expose a problem, but it takes time and knowledge to diagnose the cause. A full diagnostic is required to determine if your car has a mechanical problem or a software issue.

The diagnostic process requires a lot of time and skill, which is why shops cannot afford to provide this service for free. In addition, they need to cover the cost of their equipment and pay their ASE-certified technicians. Moreover, they need to keep their shop up-to-date with the latest diagnostic tools and software.

In addition, a reputable shop will use an honest, transparent business model. This will allow them to avoid hidden fees and increase customer satisfaction. They will also be more likely to offer a fair price for their services, which is good for you and your vehicle.

While it’s tempting to go with the lowest prices, it’s best to stick with a reputable shop that offers high-quality services. If you are not satisfied with the services provided, you can always complain to your local consumer protection agency or file a complaint with the Department of Motor Vehicles (DMV). However, DMV will only return the amount you were overcharged for repair work.

Shops that offer a guarantee

Shops that offer a guarantee are a great choice for those looking for peace of mind on their repairs. These shops put their customer satisfaction first, ensuring that all of the work they perform is done correctly. They may also provide useful amenities, such as free shuttle service or rental vehicles, to make the repair process easier for customers. Additionally, they are usually more affordable than other auto repair shops.

Most auto repair shops offer a warranty of 12 months or 12,000 miles, but some parts and repairs have longer warranties, up to lifetime coverage. These extended warranties are important for auto repair businesses because they protect their reputation and help them gain new business. They can be especially beneficial for high-quality repair shops that have a lot of repeat customers.

When selecting a shop, look for positive reviews and testimonials. You should also check the shop’s experience and expertise in the field of auto repair. These factors will affect the quality of your vehicle’s repair. If you’re planning to buy an extended warranty, be sure to read the fine print and understand what is and isn’t covered by the policy.

Purchasing an extended warranty from a trustworthy shop can save you money and frustration in the long run. A good repair shop will honor its extended warranty and will return your money if you are dissatisfied with the service. If a repair shop fails to honor its extended warranty, you can file a complaint with the Department of Motor Vehicles (DMV).

In addition to generating additional revenue, offering extended warranties helps shop owners build trust and loyalty with their customers. This is particularly important in a competitive industry. When customers feel supported and cared for, they are more likely to return for future repairs and recommend the shop to their friends and family.

Extended car repair warranties are a smart investment for your vehicle and can reduce the likelihood of costly repairs down the road. They can also prevent you from paying for expensive repairs caused by a mechanic’s error. If you’re considering an extended warranty, be sure to purchase one from a trusted shop that uses only the highest-quality parts and carries a wide variety of services.

Baker Estate Sales – Untapped Goldmines For Start-Up Businesses

Baker Estate Sales Springfield MO is the premier choice for estate sales in Springfield, Missouri, and surrounding areas. We handle everything from estate cleanouts to selling items online.

Hours before an estate or tag sale begins, the organizer puts out a sheet determining the order in which people will enter the home. Low-level furniture, silver, and jewelry dealers are the first to sign up.

Estate sales may be associated with downsizing and management of a loved one’s estate, but they are also untapped goldmines for start-up businesses. The diverse range of items available at estate sales can serve as inspiration for product design, office decor, and even marketing campaigns. Incorporating historical and cultural elements into a business can foster creativity and inspire employees to think outside the box.

Additionally, the unique and curated aesthetic that is often found at estate sales can help a start-up to create a distinct brand image that resonates with consumers. In addition, the sourcing of materials from local estate sales can support a company’s commitment to sustainability and corporate social responsibility, which can be important for many consumers today.

Creativity is important for any type of business because it combats stagnation and promotes growth and innovation. However, it is important to remember that creativity requires risk-taking and can be difficult for some people. To encourage creative thinking and innovation, it is essential to create an environment that promotes freedom from the constraints of daily tasks. This can be done by providing a safe space for experimentation and giving employees the opportunity to try new things without fear of failure.

Supporting Local Businesses

Baker estate sales have a number of benefits for the local community, including reducing waste and providing a venue to find unique items. Purchasing from a local estate sale also supports the economy, and it can provide a platform for start-ups to connect with potential customers. Many people are looking to live a more sustainable lifestyle, and estate sales are a great way to find sustainable options for the home or workplace.

The success of a business is largely dependent on establishing a strong connection with consumers, and estate sales can be a great opportunity for start-ups to do just that. Many items at an estate sale come with a story, and incorporating these stories into a start-up’s narrative can help build a sense of authenticity and create a deeper connection with customers.

In addition, estate sales can be a great source of inventory for start-ups, as they often offer high-quality pieces at a fraction of the price of new products. This can be particularly helpful for start-ups in the food or art industries, where the cost of raw materials is expensive.

A reputable estate sales company can be a valuable resource for start-ups, as they are equipped to handle the complex logistics of an estate sale. They can organize items logically, use their expertise to assess pricing, and create a marketing strategy to maximize attendance. Additionally, they can handle post-sale clean up to minimize lingering issues.

An estate sale can be a difficult time for a family, and having a reputable estate sale company can ease the process. A reputable company can manage the entire event, allowing families to focus on their own needs and goals. They can also provide a clear breakdown of costs, so families can make informed decisions.

There are a number of estate sale companies that offer top-notch services. These include Blue Moon Estate Sales of Eastern NH and Southern ME, MaxSold, and Grasons Co. Each offers a different level of service, but they all provide professional, organized, and efficient estate sales. Choosing the right estate sale company can ensure that a family’s estate is handled properly and with compassion.

Building a Story and Connection

Baker estate sales can connect buyers with a unique collection of items and offer them a chance to learn more about the history behind each item. They can also be a great opportunity for those interested in purchasing land or homes. These estate sales can be a great resource for finding antiques, furniture, and even tools and other household items that can be used in the kitchen or around the house.

The sale of the estate of Jacob Baker triggered a flurry of letters from across the country and even Europe. Many families paid hefty sums of money to the Baker Heirs’ Association in an attempt to claim their share of this massive inheritance. The money sent to the heirs’ association paid for board members, staff historians, newspaper ads, and filing fees. Many branch offices were opened to handle claims locally.

Baker Estate Sales Springfield Missouri

With a focus on professionalism and efficiency, baker estate sales can help individuals navigate the process of downsizing or liquidating their assets. They can also assist with moving, packing, and shipping. They are an excellent choice for those who are looking for a hassle-free and profitable estate sale experience.

Doug Baker is the Alumni Engagement Coordinator at Baker University. He enjoys connecting with alumni and engaging students on campus. In his free time, he enjoys spending time with his wife and three children. He is an avid hiker and enjoys the outdoors. He also enjoys playing a variety of sports and activities, especially soccer.

A new housing development in Horn Lake, Mississippi, called Bakers Acres features brand-new homes with lots that are nearly half an acre in size. These spacious properties give families the room they need to thrive. With easy access to major roads, schools, and local amenities, this community is ideal for modern families. In addition to their large yards, the homes feature open-concept floor plans and designer features. They are also highly energy-efficient. In the kitchen, you can find everything from vintage cake molds to high-end prep tables.

Creating a Dynamic Workspace

Baker estate sales offer a unique opportunity for start-ups to find items that can foster creativity and innovation within their businesses. These one-of-a-kind pieces can inspire product design, office decor, or even marketing campaigns. In addition, baker estate sales can provide start-ups with quality materials at a fraction of the cost of buying brand new supplies. This helps small business owners allocate their resources strategically and maximize their return on investment. Shop for baker estate sale items on LiveAuctioneers today.

Types of Drywall

Drywall is a construction material known as a wallboard or gypsum board. It creates walls and ceilings in homes, buildings, and commercial structures.

When installing drywall, be sure to use a tool to remove electrical outlets and light switches. A thin spiral saw is a great choice for this job. Contact Plumber Buford GA now!

Drywall is the most common construction material for walls and ceilings. It’s also used in other interior elements such as trim and molding. The main ingredient is gypsum plaster sandwiched between thick sheets of paper. Some types of drywall are coated with additives to make it soundproof, fire resistant, or rot-resistant. Other types are designed to meet specific project needs such as moisture resistance or mold resistance.

Drywall has been around for over 100 years, making home construction and renovation faster and easier than before. Before drywall was developed, most houses were built with lath and plaster walls that were hand-applied. Today, drywall is the standard building material in most homes, and it’s available in many different thicknesses to suit the space and use.

The simplest drywall is white or gray and comes in various sizes including 1/2, 5/8 and 3/8 inch. The thinner 3/8-inch option is often used for curved walls or covering existing drywall.

Specialty drywall is also available such as green or blue board. This type is ideal for areas prone to high levels of moisture such as kitchens, bathrooms and basements. It is slightly more expensive than regular drywall but offers the benefit of being mold-resistant.

Other types of drywall include type X, which is fire-resistant and has a liner-backed gypsum core. This drywall is more difficult to cut than regular drywall, but it’s a good choice for walls in garages, boiler rooms and other areas with increased fire risk.

Type C drywall is similar to type X but has an improved core that is less likely to shrink or crack. It’s also water-resistant and has added strength.

Another type of drywall is called level 5, which features a smooth surface that eliminates the need for a final skim coat of plaster. This type of drywall is ideal for rooms that will be painted or where lighting conditions can highlight imperfections. It’s a bit more expensive than regular drywall but saves time on the job because it doesn’t require a final plaster coating.

Waterproof Drywall

Drywall is essential to building and renovating a home or business, but it can be susceptible to damage from moisture. If the proper types of drywall are used, this type of damage can be prevented, and moisture-prone areas of the home or business will remain safe from mold and mildew growth.

In some rooms of the house, like basements, bathrooms and laundry rooms, drywall can be exposed to moisture and humidity that can damage the gypsum core and paper cladding. When this happens, it is only a matter of time before the drywall will start to disintegrate and show signs of water damage, including bubbles and wrinkling. Mold and mildew will also start to grow. If left unchecked, the only solution is to rip out the drywall and replace it. This is expensive and time consuming, so preventing this from happening is crucial.

One way to prevent a problem like this is to apply a waterproofing primer over the entire surface of the drywall after it is installed. This can be done by a professional or DIY homeowner. However, another option is to purchase waterproof drywall that has already been treated with a moisture-resistant primer. This type of drywall is usually called green board or moisture resistant drywall. It is similar to regular drywall, except that the face and back papers have been treated with a waxy coating and chemicals that make it more resistant to mold and moisture.

Another type of waterproof drywall is fire-resistant, which can be used in certain applications where the drywall must pass a specific fire rating test. This type of drywall has the same gypsum core as regular drywall, but it is thicker at 5/8 inch and has a liner-backed gypsum core that is infused with noncombustible glass fibers. This type of drywall is often used in apartment buildings, garages and other applications that must pass a one-hour fire resistance test. Both types of mold and fire-resistant drywall are available in green, pink, yellow and white.

Foil-Backed Drywall

Foil-backed drywall is ideal for exterior walls and ceilings in new construction or remodeling on furred masonry, wood framing or steel frame. Pb Lam laminates a Foil Scrim Kraft (FSK) to the back side of manufactured gypsum wallboard. This vapor retarder is non-strippable, heavy-duty, clay-based and mildew resistant. It has reflective properties for radiant energy that help to keep rooms cooler and provides a lower permeability of 1 perm versus 3-4 perm for gypsum wallboard installed separately.

This type of drywall can also be used in interior walls but is typically not necessary as other types of moisture-resistant plasterboard are available. This drywall can be installed using the same process as regular gypsum board, and it features GridMarX guide marks that make installation faster and more accurate.

Fire-Resistant Drywall

Fire-rated drywall is essential for meeting building codes and ensuring safety in residential, commercial and industrial construction. Drywall consists of gypsum, a natural mineral that has inherent fire-resistant properties. In a fire, the water molecules in gypsum are released as steam, retarding the spread of flames and smoke. The addition of additional ingredients like glass fibers and other additives enhance these fire-resistant qualities, making fire-rated drywall more effective than standard drywall.

Many local building codes require the use of fire-rated drywall in certain areas such as garages and utility rooms or in walls that separate different living spaces, known as partition walls. This type of drywall is typically more expensive than regular drywall but it can help to save lives and property in the event of an emergency.

In addition to enhancing occupant and employee safety, fire-resistant drywall can also reduce damage to equipment, inventory, and other valuable assets within a building. It also helps to deflect the spread of a fire, giving firefighters more time to contain it and prevent further damage. In some cases, buildings that use fire-resistant drywall may qualify for lower insurance premiums, providing cost savings over time.

In addition to containing and suppressing fires, fire-resistant drywall can also delay the release of harmful gases that may be produced during combustion, thus improving air quality in the surrounding area. This can be particularly important in buildings that store sensitive equipment and materials such as telecommunications, financial data centers, and manufacturing facilities.

Navigation